Friday, March 14, 2008

Bonfit Fitted Shirt #2: The last Bonfit Bodice Adventure

Nothing worthwhile comes easy... This proves it. I'm getting closer to a nice fitted shirt. Here's pics of the changes I made to the last pattern. You can see I've overlayed the new pattern over it and used a red pencil to make changes. On the front piece, I've done the following:
  1. Added to the front hem.
  2. Moved the bust point down about 1/4"
  3. Removed 1/4" from the shoulder slope.
  4. Cut in the front armhole about 1/4"
  5. Reshaped the dart.
  6. In addition, after I tried it on, I reshaped the dart making it straight from the waist down to the hem.
  7. Took in about 1/4" from the area below the dart. I reshaped the side seam a little and tapered it back out at the hip.

On the back piece, I made the following adjustments:

  1. Made the upper part of the dart almost 2" longer.
  2. Added a tiny bit to the across back width.
  3. Removed 1/4" from the shoulder slope.
  4. Did a sway back adjustment, thus added a bit more to the bottom hem as well. (might be a little too much).
  5. Added 1/2" extra back hip space at the side seams.
  6. Also took in an additional 1/2" at the center back. Give it a little more shape.

Okay, now here's the worst part. After I did all this redrafting, I decided to use the instruction sheets from a drafting class I took several years ago. It was taught by an older Japanese lady famous for her skills. The sloper I made then fit very well and I designed quite a few things from it. Then I had another baby and it got lost at my mother's house, only to be recovered this past week.
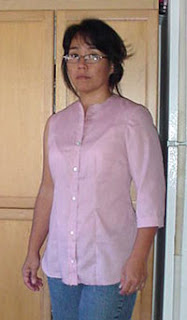
Anyway, I took the instructions for the sleeve (I was terribly disappointed with Bonfit's version and could not see how I could improve it) and drafted the sleeve from that. I got a comfortable fit, and only slight problems. The puckering is my fault, there is just enough ease in the cap, but I wanted to get this done so I quickly sewed it in. The twist in the front? I'm not sure yet, but it's not too bad and I'm sure I can figure it out. Any suggestions?

The back has a few wrinkles and I'm not sure if it's just caught up on my jeans or if more work needs to be done. But I'm a bit fed up with this shirt and would like to move on already.

So... Bonfit's bodice patterner works well enough for a loosely fitted garment, but I will never again use it for anything fitted. It's just way too much work to make all the adjustments for a decent fit.

I'm giving up on Bonfit Bodice and will return to the good old fashion dressmaker's rule, big sheets of paper, and a good sharp pencil. Oh... I have to make at least ONE shirt from this mess. Just so I have something to show for all this work.

Monday, March 10, 2008

The dress that inspires


Simplicity 3904: That's so Raven dress/top

Fabrics used: Lightweight aloha print cotton/ Polyester georgette


Sorry about the mugshot. I asked her to strike a pose and this was the best she could do. She was however, very happy about her new dress and wants to learn how to sew again. "I want to make pretty dresses for me and my friends!" I quote her exact words... Wow... I hope she's serious.
She needed a dress for her band concert this weekend, the requirements for 7th graders were aloha print shirt or dress, shoes or sandals. I found the dressweight green aloha print fabric and the georgette at WalMart for a total of about $9.00 (including thread). Can't beat that price.
The front bands, ties and hem band has an overlay of the georgette. I was thinking of doing it over a solid color green, but found my stash green didn't have enough. It was also too heavy for this dress. This, however, looks great.
The pattern is simple to sew, but I changed the way the facings were done in order to make the inside edges look more polished. One tip to remember when sewing facings, Always understitch. It helps pull the facing to the inside and prevents it from showing. Here's a picture of the neckline.


I'm very pleased with the results. This is the style I remember seeing in my elementary school years. It was a favorite muumuu design for pregnant moms. Now, only the skinny kids wear it, and the pregnant moms are wearing tight shirts that show off their bellies! Funny how times change.

Wednesday, March 5, 2008

Bonfit Fitted Shirt #1

Do I look somewhat annoyed? Thanks to Bonfit... The fit is not too bad, but it certainly is not all that great. I made the fitted shirt, and tried to fix the problems I had with the basic shirt while doing this one. It helped some, but I see there's still alot of work to be done. Here's the muslin.


  1. Those bust points should be about 1" further out on each side. The recommended 3/4" ease is not enough.
  2. The waist darts need to be shifted out to the sides a bit more. I'm considering making two very slim darts instead of one big one.
  3. The collar is still too big.
  4. Hip line does not have quite enough ease to be worn over my jeans. I like a bit more space.
  5. I shifted the sleeve towards the back, which solved the twisting problem. But now theBack of the sleeve at the armhole needs to have a bit removed, front too. Guess I will have to reshape the sleeve seam.
  6. My side seam shifts towards the back at the hip.
  7. The back is still very baggy above the waist. Since the hip is too tight, it poofs out between the shoulder blades to the top of the hip.
  8. But the length will be fine once hemmed. I fixed the front by adding about 1 1/2" tapering to the side seam.
  9. Also added 1" to the bicep for space.
  10. Practiced a little sleeve detail at the back of the sleeve. I think I'll move it to the side and make it longer, it's about 3" now... maybe cut the sleeves to 3/4 length too. I plan on making the same gathered detail at the bust along the center front when I get this shirt perfected.

Okay... that's it for today, it's time to do the mommy thing again and pick up kids.

Tuesday, March 4, 2008

Bonfit basic shirt - attempt #1

And now I've decided that in order to get to REALLY know the Bonfit patterners, I'll have to go through the whole process and do each of their basic garments. Today, I drafted the basic shirt pieces. This one has no darts and is not fitted at all. It is simply a shirt and I don't really like a lot of things about this pattern.


First, here's a picture:


I followed the directions and here's what I found:
  1. There are vague areas that could've been improved by adding pages to refer to. Example: the drafting of the placket placement should be done when the sleeve is drawn. It has no reference as to where to put it, but the info can be found elsewhere in the book. I think it was on page b40.

  2. The instruction manual needs to be edited. Directions refering to the sleeve cap widening/narrowing on page b31 are misprinted. "If you want less blousing at the sleeve cap or have changed the shoulder width so that you need a wider sleeve cap:" should read Narrower instead of wider.

  3. The button stand is way too wide. I realized this when I drafted, but continued on anyway so that I'd have a shirt to show using the method. It should be half of what it is.

  4. The front length is too short, but this might be just my body/and preference.

  5. The collar is too big. I did adjust it to make the top edge straight instead of curved, but I think it would still be too big and pointy for me.

  6. The cuffs fall too low. I adjusted the shirt sleeve pattern as it states in the directions, and removed the extra for the cuff, but I think it would look even better with a bit more removed.

  7. The sleeve twists forward. This is usually true of most basic straight sleeved patterns. I don't like this and usually make an adjustment by shifting the whole sleeve piece about 1/4"-1/2" towards the back. It helps eliminate that twist wrinkle. I didn't do it here.

  8. Across the front is too wide. I'll need to cut about 1/2" into the front bodice in order to get rid of the wrinkle.

  9. It hangs... but then, I expected this because I didn't make a fitted blouse. I like it darted and fitted at the waist and will do another one with those adjustments.

  10. The back... same thing. I'd like it fitted, but this is the way this one should be, and it almost fits okay across the shoulders and upper back. I think it might need just a tiny bit more space across the shoulders.

Alrighty, I'm off to redo the shirt in a more fitted version, with all those corrections listed above. Hopefully I'll be back with a well-fitting garment using the Bonfit. Wish me luck!

I'm also working on Kenneth King's Moulage CD book with hopes of having something even better... let's see what works.


Monday, March 3, 2008

Bonfit vs. Kenneth King's Moulage CD


After starting a SewAlong for the Bonfit Bodice on PatternReview.com, I decided it would be neat to compare the results of a basic bodice sloper with Kenneth King's Moulage. Here's the first post on the progress of that comparison.


Bonfit is a plastic patterner with sliding panels and knobs that tighten to hold them in place. It's supposedly a basic pattern that can be used to make nearly anything you want. This one is for the Bodice and can be used for tops, shirts, and uh.... bottomless dresses? It says you need the skirt patterner in order to make a dress. IMHO, probably not... though I have that one too. It provides you with a ready made framework of a pattern that you can just draft out and add your design details to.


Kenneth King's Moulage serves a different purpose. It's like having a 2D frame of your own body that you use to create your designs from. Kinda like a 2D dress form. You'd have to add your own ease and design details, but the basic placements of the bulges and bumps should be in the right places so you'll know where to skim over them.


Below is the Bonfit bodice draft I made for a basic fitted shirt. Using the basic measurements as directed by the book, I drafted out the basic bodice pattern. There is ease calculated into the pattern, it's made to be a "ready made" shirt pattern once drafted. Here's my basic bodice for the basic fitted shirt BEFORE I did any fittings and made any adjustments other than what was stated in the book. For my body, that was the narrow shoulder. Remember, it does NOT serve the same purpose as the moulage, but it should follow the shape of it.


Then I tried making a pattern using Kenneth King's CD for the Basic Bodice. Here's what it looks like before I made any alterations to that one. Funny shaped armholes, and the shoulder slope looks very different, but we'll have to see a muslin before we decide which one fits best.


Bonfit


Pros:
Basic sloper just needs transferring to paper and can be used for any body within a given range.

Cons: There are some mistakes and omissions in the book. Since this system is meant to be used by a range of learning levels, nothing should be left out.


The Moulage CD by Kenneth King


Pros: I like that this CD provides a more personalized fit. He also offers many explanations regarding why we do certain strange adjustments... like subracting a 1/4" for bias. You don't get that explanation in most drafting books. It also has a video clip on the proper way to measure your model. It would be great if measuring could be done alone, but this is great info for your not-so-adept-at-sewing helper, like DH.

CONS: Hmmmmm.... wait... I'm thinking.... Maybe you need to be able to do basic math? Is that a con? I don't think so, it keeps my brain from going soggy. Ah... one thing, an solution is provided for adjusting most deviations you might find while drafting, but I did not see one for my situation. My shoulder point was higher than the one on the framework. There is a solution stated in the book regarding lowering it, but not raising it. It could be that it's the same process though. I did the alteration as he stated in the book, but it did make my shoulder slope look a little weird.


To be continued...


Next chapter: The Muslins